Here’s what I used for my low-cost home recording studio for Voice over. You can get a pretty decent setup for under INR 20,000. Read below for a quick review of my setup
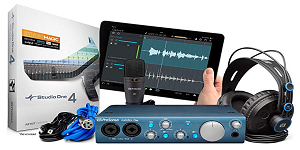
- PreSonus Audiobox iTwo Studio USB/iPad hardware/software recording kit, Blue – Comes with a very good quality condenser microphone, really good headphone, audio interface, and Studio One Artist DAW. Not much of an investment – cost me INR 18,999 on Amazon.
- OVERALL VALUE FOR MONEY: EXCELLENT
- Condenser microphone – Very good quality
- Headphone – Very good quality
- Audio interface – Very good quality. Nice blue color, easy to get it to work with a computer
- Studio One Artist DAW – Struggled to get it to work. Eventually, gave up and used (and continuing to use) Audacity
- Robustrion Microphone Suspension Boom Scissor Arm Stand – Needed if you want to anchor your microphone at varying angles to your work desk or table. This is a decent quality stand and is easy to setup. Not very useful if you’re setting up your microphone within a closet
- OVERALL VALUE FOR MONEY: GOOD
- Wright Wp 101 Pop Filter – Must have, to eliminate pop sounds when you speak into the microphone. Since the microphone is very sensitive, please do buy a Pop filter to assure yourselves of good quality recordings. This can be very easily attached in front of the microphone on the stand mentioned here. All mic stands provide this facility. Keep the pop filter about an inch from the microphone and speak about 6 inches away from the pop filter
- OVERALL VALUE FOR MONEY: EXCELLENT
I struggled with “liveliness” in my voice recordings for quite some time. “Liveliness” is when you hear an echo-like hum in the background as if you’re speaking in a large empty hallway. Thanks to my voice-over mentor Anthony Reece for helping me identify that I had an issue, in the first place. I couldn’t even recognize I had an issue with my recording until he pointed it out to me. So, how did I solve it without breaking the bank?
I set up my entire recording equipment inside a closet, with the usual shirts, suits etc hanging around. For extra sound absorption, I threw a few blankets on the hangers and erected soft pillows around the microphone – on the left, right and behind. That’s it!!! Irrespective of your voice acting skills, I’ve come to understand that your voice recording quality can make or mar your voice acting career. So, please pay 200% attention to this aspect and get your recording quality right!